Download Imagenomic Portraiture for macOS
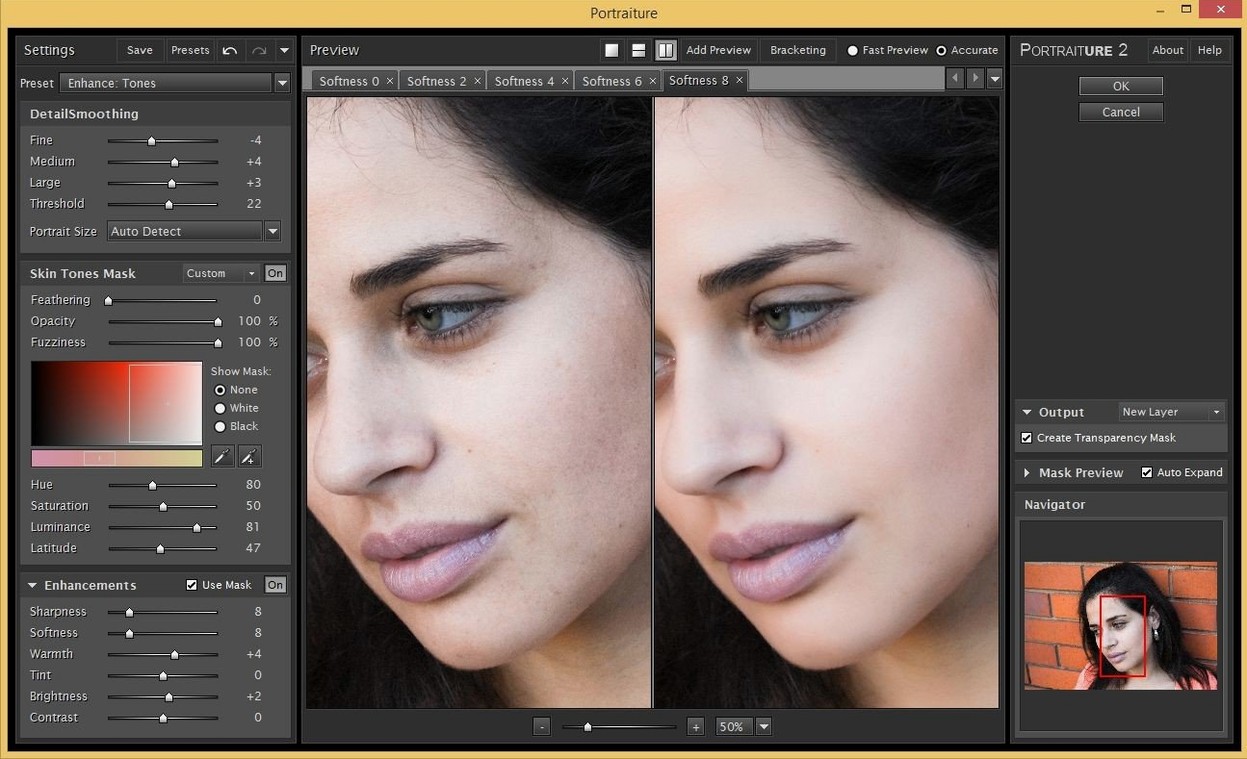
You’ve nailed the lighting, the model’s expression is just right, but the skin still needs work. Instead of zooming into every pore and spending twenty minutes with the clone stamp, you open Portraiture, let its engine read the frame, and watch it smooth skin while leaving eyelashes and lips alone. That’s the whole idea — it’s a plugin built to shorten retouching from a chore to a few slider moves.
What the smoothing engine actually controls
The core is a next-generation AI smoothing engine that masks skin automatically, so you’re not painting selections by hand. You still steer the result: a detail slider keeps texture from turning plastic, and strength controls how far the smoothing goes. It’s smart enough to recognize different skin tones and not smudge hard edges like hair or jewelry. For photographers who live in Lightroom Classic or Photoshop, that means one less round-trip to a separate app.
Hosts and how it fits a Mac workflow
Portraiture runs as a plugin inside Photoshop, Lightroom Classic, and Affinity, with support from macOS 13 onward on both Intel and Apple Silicon Macs. It doesn’t stand alone — you invoke it from the filter or edit menu right where your raw file already lives. The interface stays in English, and the controls are compact enough that you can dial a look and close it without breaking your editing rhythm.
What’s different in version 4.5 Build 4501
The most noticeable shift in daily use comes from the reworked AI engine. Imagenomic calls it next-generation, and in practice that translates to fewer false positives around hair strands and metallic jewelry. Where earlier builds sometimes grabbed an eyebrow and softened it into mush, Build 4501 keeps the arc sharp while still tackling the cheek right beside it. That alone cuts down on post-plugin cleanup — the small stuff you’d fix with a layer mask afterwards.
Mask detection across skin tones also feels more even. Shooting a subject with deep complexion under mixed lighting no longer sends the engine hunting for edges it can’t find. The preview window redraws faster too, especially on Apple Silicon, so scrubbing the strength slider between 40% and 70% doesn’t lag behind your hand. If you’ve been holding onto an older build, this is the version where the plugin starts behaving less like a filter and more like a junior retoucher who already knows where the face stops and the background begins.
Two-second raw retouch on an M-series Mac
Portraiture runs lean for what it does. On an M-series Mac with 16 GB of RAM, applying the effect to a 45-megapixel raw takes roughly two seconds — faster than exporting a full-resolution TIFF. The plugin doesn’t spawn background processes that linger after you close Photoshop, and memory usage stays modest because it works inside the host’s own image buffer rather than duplicating the file.
Stability has been solid across Photoshop 25.x and Lightroom Classic 13.x. I’ve thrown batches of thirty portraits at it in a single session without a crash, though Lightroom’s plugin architecture feels a touch slower to hand off than Photoshop’s filter pipeline. On Intel Macs there’s a brief beach ball when the mask initializes on very large files, but it’s a one-time wait, not a recurring hiccup. The installer is unsigned, so Gatekeeper will block the first launch — mounting the disk image and running that Terminal command is an extra step, but after that macOS treats it like any other plugin.
Clean base skin before texture work
The plugin doesn’t try to replace frequency separation or dodge-and-burn — it sits upstream of them. A common rhythm is to run Portraiture first, bring skin into a clean base state, then add texture back with a high-pass layer or a micro-contrast brush. Because the effect lands on its own layer in Photoshop, you can reduce opacity, paint out areas that didn’t need smoothing, or stack a second pass with different settings for the forehead versus the neck. Lightroom users get a non-destructive workflow too, since the plugin writes its adjustments into a TIFF copy if you’ve set up external editing that way.
macOS features tie in without much friction. The plugin respects the system color profile, so what you see in the preview matches exports and prints. Spotlight doesn’t index plugin settings, but you can save presets inside Portraiture and sync them across machines by dropping the preset folder into iCloud Drive — handy if you split editing between a studio Mac and a laptop. Affinity users on the fence should know the plugin loads through Affinity’s Photoshop plugin compatibility layer, and in Build 4501 the mask preview works correctly there, which wasn’t true two versions ago.
A full portrait retouch, step by step
Here’s a real-world path I follow when a headshot lands in my library and needs to look polished without looking retouched.
- Global exposure and color. In Lightroom, I balance the white point, lift shadows under the eyes a little, and set a gentle S-curve. The goal is a neutral starting point so Portraiture isn’t guessing through heavy contrast.
- Send to Photoshop. Right-click, edit as Smart Object in Photoshop. That keeps the raw adjustments live and lets me revisit the Portraiture layer later.
- Duplicate the layer and open Portraiture. I name the duplicate “Skin Base” and invoke Portraiture from the Filter menu. The auto-mask pops up in under a second.
- Dial the look. I set Strength to 60%, ramp Detail to “Fine” or “Medium” depending on the subject’s skin texture, and push Smoothness just until the large pores on the nose soften. The side-by-side preview is essential here — I toggle it to check eyelashes and lip edges haven’t blurred.
- Mask the mask. Back in Photoshop, I add a black layer mask to “Skin Base” and paint white with a soft brush only where the skin needs smoothing. This leaves hair, clothing and background at full sharpness. If the subject has stubble, I take opacity down to 40% around the jawline.
- Spot cleanup. A quick clone stamp on any blemishes the plugin skipped, then a high-pass overlay at 2-pixel radius set to Soft Light brings back the micro-texture that reads as “real skin” on a screen.
- Save and round-trip. Saving the PSD sends the finished file back to Lightroom, stacked next to the original raw. The whole process from import to export runs about four minutes per portrait once muscle memory kicks in.
Single-pass smoothing versus spot-level healing
Portraiture’s biggest rival in the plugin space is Retouch4me Heal. Where Portraiture acts as a single-pass smoother with fine-grained sliders, Heal leans harder into automated blemish detection — it spots individual spots and removes them like a healing brush, then offers a separate skin-softening step. Heal works standalone or as a plugin, which is a flexibility Portraiture doesn’t match since it requires a host. But Heal’s mask edges can look waxy on darker skin under warm light, and Portraiture’s Build 4501 handles those gradients more naturally. If your work is high-volume headshots where speed matters more than texture fidelity, Heal wins on batch throughput. If you’re printing large, Portraiture’s control over fine detail gives you more to hold onto.
PortraitPro takes a different route: it’s a standalone editor with face-sculpting tools, eye brightening, and makeup simulation built in. The skin smoothing there is tied to a full face-mesh system, which means it can reshape a jawline or enlarge pupils while it smooths. That’s powerful for glamour retouching, but the plugin model is clunkier — you export a file, process it in PortraitPro, and bring it back. Portraiture stays inside your main editor, so you aren’t juggling two libraries. For photographers who already have a tight Photoshop or Lightroom workflow, that in-place editing matters more than sculpting features.
ON1 Portrait AI sits somewhere in the middle. It’s available as a plugin and as a standalone app, uses AI to find faces, and applies smoothing with a few preset strengths. It’s fast and beginner-friendly, but the sliders are coarser — you get less control over the transition between smoothed and unsmoothed zones. Build 4501 of Portraiture gives you that transition control through the Detail and Sharpness sliders, which ON1 doesn’t expose. If you need a one-click solution for a wedding gallery of 600 frames, ON1 does the job. If you need to deliver a retouched portrait where the skin still shows weave and pores at 100% zoom, Portraiture’s engine is the more surgical tool.
Build 4501 brings a next-generation version of the AI smoothing engine, tuned to keep skin texture more natural while still cutting down manual mask work.
- macOS 13 or later (Intel and Apple Silicon)
- Host: Photoshop, Lightroom Classic, or Affinity
Questions people ask
Can Portraiture work with Affinity Photo on Mac?
Yes, the developer lists Affinity alongside Photoshop and Lightroom Classic as a supported host application.
Does the plugin need an internet connection for the AI engine?
No, the smoothing engine runs locally on your Mac so you can retouch anywhere without an active connection.
Also on readers' docks
Sign in or create an account to leave a comment.
No comments yet. Tell me how it got on with your other devices.