








Download Superior Drummer for macOS
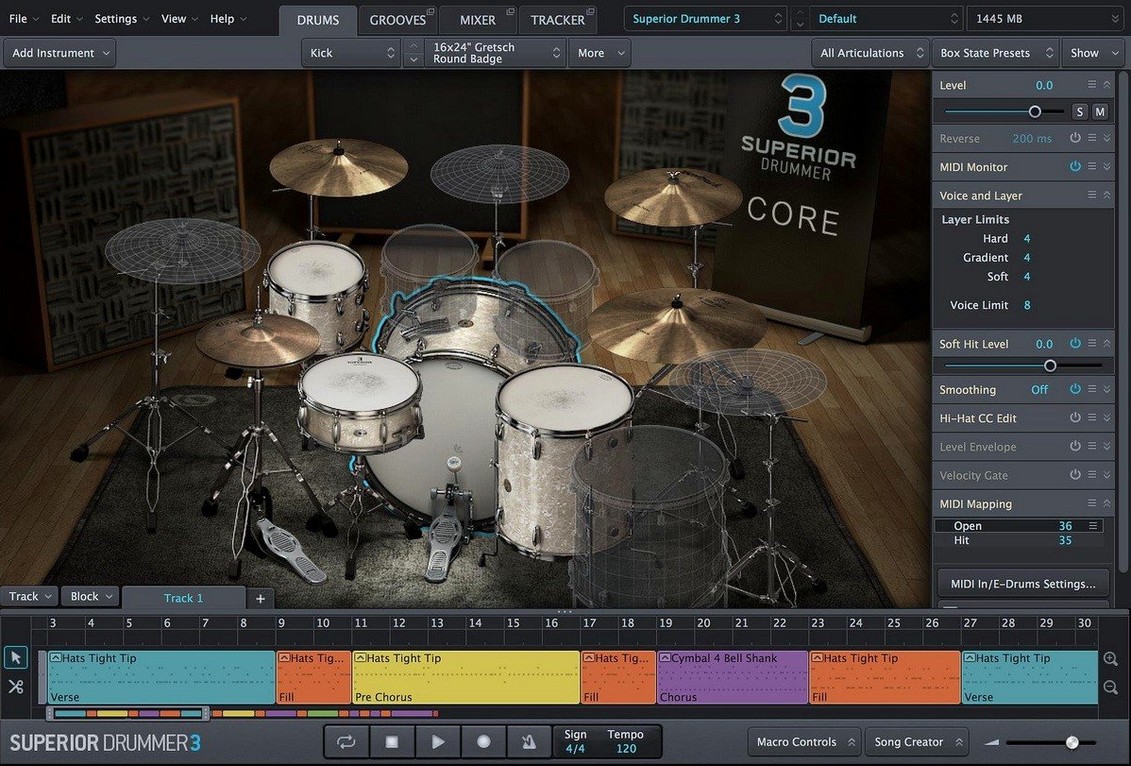
If you’ve outgrown the stock drum sounds in GarageBand or Logic Pro and find yourself tweaking every single velocity layer, Superior Drummer 3 is the logical next room to walk into. It’s a full-scale virtual studio that puts a 230 GB library of acoustic and electronic drums at your fingertips, complete with a built-in mixer and the clever ability to convert drum audio into MIDI data.
Check Mac compatibility
Superior Drummer 3 runs on macOS 10.13 and later, with native support for both Intel and Apple Silicon chips. You’ll need a 64-bit host, but that’s standard for any modern DAW.
Bridge acoustic and electronic kits
The software isn’t just a sampler — it’s a sound design hub where recorded snare hits and synthesized kicks coexist on the same grid, letting you blend genres without leaving the interface.
Convert audio to MIDI
Drop in a drum loop or a tapped beat, and the engine translates the audio into MIDI notes that drive any kit in the library — a lifesaver for replacing sounds without replaying the performance.
Envelope follower hidden in the mixer
After a few weeks with Superior Drummer 3, you start noticing the little things that speed up everyday work. One of my favorites is the envelope follower on every channel strip — it's tucked away in the mixer and lets you duck the room mics whenever the kick hits, giving you a cleaner low end without setting up a sidechain in your DAW. Right-clicking almost anything brings up a context menu with options you wouldn't guess were there, like copying a channel's entire processing chain to another kit piece in two clicks.
The macro controls on the main page are another quiet powerhouse. You can assign multiple parameters — say, pitch, attack, and a high-pass filter cutoff — to a single knob, then save that mapping as a preset. For dense sessions where you're auditioning snare blends, this cuts the fiddling down to a twist of the wrist. And if you hold Option while dragging a fader in the mixer, it moves in finer increments — a small touch, but a real one when you're chasing the right amount of bleed.
Also easy to overlook: the kit piece search bar sits at the top of the browser and responds to partial names, so typing "maple" instantly filters across all seven kits and any expansions you've added. No more scrolling through folder trees at 2 a.m.
Install the 230 GB library without interruption
The download is substantial, so let the installer run its course without interruption — the disk image contains a straightforward step-by-step setup that places the 230 GB library where you tell it. Once that's done, open the standalone app before launching your DAW. It builds its database on first run, and doing it outside a heavy session avoids a plugin timeout that can happen in Logic Pro or Cubase.
Next, head into Settings > Libraries and confirm the path points to the sample folder. If you move the library later to an external SSD (which I recommend for keeping your Mac's internal drive breathing), update this path immediately — Superior Drummer won't prompt you; it'll just show missing samples with a subtle orange dot on the kit piece.
Spend your first hour learning the velocity curve editor, not building a full track. Tap out a few hits on your controller or keyboard, open the mapping page, and adjust the curve so your playing style translates naturally. The default curve works for many, but if you're a light-touch player on a MIDI keyboard, a slight logarithmic bend makes the ghost notes sing without forcing you to hammer the keys. Save this as a global preset and you're set for every future project.
One more thing that'll save you later: tag your favorite snares and kicks with the star rating system in the browser. The library is deep, and after a few days of auditioning, the starred items become your personal shortlist that pops up with one click on the filter bar.
Playback no longer hiccups on Apple Silicon
With version 3.4.4, the most immediately noticeable improvement is stability on Apple Silicon Macs — the plugin no longer hiccups during heavy track counts when you're switching between kit presets mid-playback. That alone makes the update worth applying, especially if you've been nursing the habit of stopping transport before browsing sounds.
Under the hood, Toontrack laid groundwork for forward compatibility: version 3.4.0 (and by extension 3.4.4) is required for any Superior Drummer 3 products released from Q2 2025 onward. In practical terms, if you keep your installation current, you won't hit a wall when new SDX expansions drop later this year. The disk image installer remains the same straightforward process — open it, run the package in sequence, and you're done.
Day-to-day, the update tightens up the audio-to-MIDI conversion timing. Dragged-in drum loops now map to the grid with tighter transient detection, meaning less manual quantization cleanup after conversion. It's the kind of change you don't notice until you realize you haven't nudged a kick MIDI note in three sessions.
Workflow: building a drum track from a rough audio loop
Here's a start-to-finish path I use when a songwriter sends over a scratch drum loop and wants a full, produced kit around it. The audio-to-MIDI feature is the linchpin, and the whole process lives inside Superior Drummer 3 without bouncing between plugins.
- Drop the audio onto the tracker. Open the Tracker page and drag the loop file into the waveform area. Hit analyze — the engine breaks down transients into kick, snare, and cymbal candidates in under ten seconds.
- Tweak the detection threshold. Move the sensitivity slider until the hit markers align with the actual transients in the waveform display. A lower threshold catches ghost notes; a higher one keeps hi-hat bleed from triggering false hits. I usually land around 40% for a dry rock loop.
- Assign articulations. Drag each detected hit type to the corresponding kit piece on the right panel. If the loop has a rimshot, pull that to the snare rim articulation — Superior Drummer maps it intelligently, but checking the assignment avoids a center hit where the rim should be.
- Send MIDI to the kit. Click "Send to Grooves" and the MIDI block appears in the grid editor. From here, you can quantize loosely — 70% strength keeps the human feel while tightening the pocket.
- Swap and sculpt. Browse the kit library while the MIDI plays back. The seven included kits cover tight funk, huge rock, and dry jazz territory. I'll often layer a second snare from the electronic side, blending it low under the acoustic sample for crack without losing body.
- Mix in the box. Open the built-in mixer and apply the 35 included effects. A touch of compression on the kick channel, some tape saturation across the room mics, and a high-shelf on the overheads often gets the sound 80% there before the DAW faders even move.
- Print or route. Either bounce the master output to a new audio track, or set up multi-out routing in your DAW to record each mic channel separately. For final mixes, the multi-out approach gives the mix engineer full control over the ambient mics.
What makes this workflow stick is that the conversion, sound selection, and mixing all happen in one window — no round-tripping audio stems between separate pitch-to-MIDI tools and drum samplers.
Turning placeholder loops into real kits
Maya is a mix engineer who works with indie rock and electronic crossover projects. A typical week brings her a half-dozen tracks with placeholder drum loops that need to sound like a real kit before the artist signs off. She keeps Superior Drummer 3 open on her Mac Studio as a plugin in Logic Pro, routed to 16 multi-out channels so each kit piece hits its own bus in the console.
This morning's session is a synth-heavy track with a programmed kick and a thin acoustic snare loop. Maya drags the snare loop into the Tracker, converts it to MIDI, and maps the resulting hits to a deep brass snare from the stock library. She blends in a piccolo snare at 30% for the ghost notes, using the envelope follower to clamp down the room mics when the kick fires — tightening the low end without a separate compressor plugin. By lunch, the drums sit in the track as if they were recorded in the same room, and the artist's revision notes are down to "turn up the hats a touch."
For Maya, the draw isn't just the sample depth — it's that she can match a performance's nuance without programming velocities by hand, and the built-in effects keep her CPU free for the guitarist's three amp sims further down the session. When a project moves from demo to final mix, the multi-out setup means she can hand off stems that the mastering engineer can dial in independently.
Version 3.4.4 is out now. Note that if you pick up any Superior Drummer 3 expansions released from the second quarter of 2025 onward, you’ll need version 3.4.0 or later already installed.
- macOS 10.13 or later
- Apple Silicon and Intel (x86) support
- 64-bit host application
- English interface
Also on readers' docks
Sign in or create an account to leave a comment.
No comments yet. Tell me how it got on with your other devices.
More in VST Plugins
See all Supertone Air
1.0.1 VST Plugins
408 MB
Supertone Air
1.0.1 VST Plugins
408 MB
 Synapse Audio The Legend HZ v2.0.2.R1
2.1 VST Plugins
472 MB
Synapse Audio The Legend HZ v2.0.2.R1
2.1 VST Plugins
472 MB
 T-RackS
6.3.2 VST Plugins
2.3 GB
T-RackS
6.3.2 VST Plugins
2.3 GB
 Steinberg SpectraLayers Pro
13.0.20-All-in-One VST Plugins
3.9 GB
Steinberg SpectraLayers Pro
13.0.20-All-in-One VST Plugins
3.9 GB
 Spire
1.5.19 VST Plugins
158 MB
Spire
1.5.19 VST Plugins
158 MB
 Updated Sonic Academy KICK
1.1.8 VST Plugins
358 MB
Updated Sonic Academy KICK
1.1.8 VST Plugins
358 MB
 Tone Empire EDYN
1.0.2 VST Plugins
198 MB
Tone Empire EDYN
1.0.2 VST Plugins
198 MB
 Toontrack EZkeys
2.1.5 VST Plugins
707 MB
Toontrack EZkeys
2.1.5 VST Plugins
707 MB